

This post may contain affiliate links. Read our full disclosure.
Milk Kefir
Fermented milk is a huge part of Ukrainian cuisine! Traditionally, fresh milk was left to ferment and sour in a warm place by the stove until it was naturally sour. It sometimes took a day or even three to thicken. This method of soured milk is best when using fresh raw milk and differs in flavor, as it is more acidic due to the natural bacteria that will occur during fermentation.
Making kefir milk with grains is a shortcut to the traditional method of souring milk for days. Doing it this way makes it less acidic. Instead, you would put some kefir grains into the milk and let it thicken. Live kefir grains make it possible to use store-bought pasteurized milk, raw cow’s milk, sheep, and goat milk. Avoid using ultra-pasteurized milk for good kefir.

What is Kefir?
Kefir is a fermented milk drink with a tangy and sour taste, similar to cultured buttermilk. When made with a culture or kefir grains, it thickens and, once strained, is similar to drinkable yogurt.
Ukrainians love to make fluffy pancakes (Oladky) using kefir (cultured milk) and adding it to a sweet pastry dough like Poppy Seed Rolls. I have been making kefir smoothies that the children beg for and kefir ranch dressing that the whole family loves with homemade kefir! It keeps in the fridge for a long time and is constantly on repeat for our favorite kefir recipes!
What are Kefir Grains?
They are live grains of dairy cultures, full of beneficial microbes! They look like tiny cheese curds and can colonize very quickly. They’re a great way to culture milk for beverages like Kefir or cheese-making! The best way to think of them is like a starter, to culture milk, similar to a sourdough starter that cultures dough.

Supplies You Will Need:
Homemade kefir is way better than any store-bought kefir because you know exactly what ingredients are in it, and you can control what kind of milk you want to use! Here is everything you need to get started!
- Kefir Grains- I try to keep about 2 tablespoons of kefir grains per quart. You could start with 1 tablespoon of milk grains, but it may take up to 24 hours to thicken. Using 2 tablespoons of grains can thicken the milk for around 12 hours when in a warm spot.
- Quart Size Glass Jars- I use a regular mouth glass jar because that is the jar I was gifted kefir-grains in, but a wide mouth jar will work too for getting the thick kefir out as it will slip out easily when inverted.
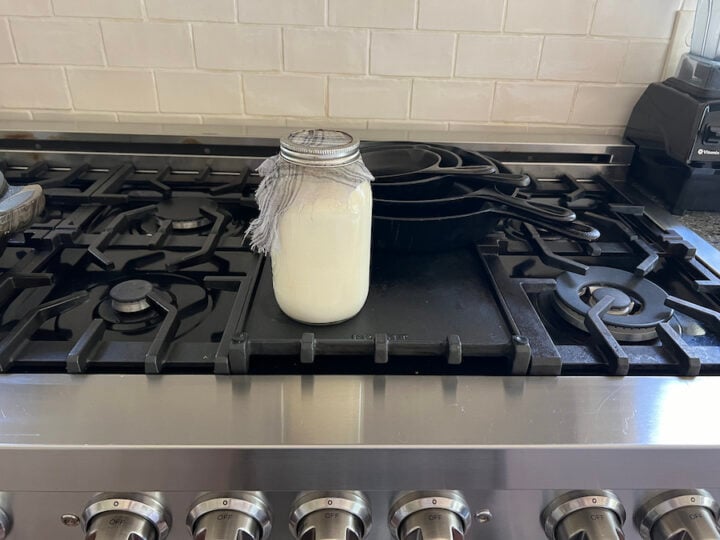
- A Mason jar ring or rubber band should be used to cover the jars, along with a square piece of cheesecloth or coffee filter. You want the milk to be exposed to air when fermenting.
- Stainless steel mesh strainer: This is used to strain the milk kefir once it has thickened. I use a metal strainer with larger holes, as small holes make it harder to strain. You could also use a plastic colander. Be sure to strain the kefir into a large bowl with a spout to transfer it into a jar later.
- Cow’s milk—When using raw milk, many more beneficial bacteria and enzymes are already in the milk, which will help the grains multiply faster. You also get the benefits of cream on top for a richer kefir. Pasteurized whole or 2% milk will work, too. Rehydration of your milk kefir grains is recommended to wake them up when using dehydrated grains.
Making kefir at home is so easy to maintain! Part of my simple routine is straining off the grains and adding them to new milk, then keeping it in the fridge until needed to make smoothies, etc. It’s so simple, not hard at all! This may sound intimidating, but it really isn’t. Here’s how to make your very own milk kefir.
What To Do If My Kefir Grains Are Dehydrated?
When you first get your kefir grains, you must rehydrate dried grains or use live, active ones. Remember that the first couple of batches may not turn out perfect due to the change in temperature and milk. So, don’t chuck them out thinking they are broken; they will work; you need patience and time for them to adjust to the new environment.
Generally, you must add 1 cup of cold milk to a packet of Dehydrated Milk Kefir Grains every 24 hours, discarding the milk until it thickens. Once the milk thickens, it’s active and ready to use. This can take up to 2 gallons of milk, or you can begin with active milk kefir grains (that you can buy on Etsy).
How To Make Kefir:
- What size jar you use will determine how many grains you will need to put into each jar. Start with a quart-sized jar, as you can always build up the good kefir and store it in the fridge for weeks. Place 1-2 tablespoons of active kefir grains into the jar and cover with enough milk to fill up the quart jar to headspace.
- Cover the jar with a cheesecloth or coffee filter secured by a rubberband or with the screw bands that canning lids come with.
- Allow the milk to culture at room temperature (68 to 78°F degrees is ideal) for 24 hours. Do not exceed 48 hours, especially in the summer, as the kefir will be too sour. Anywhere from 24 to 36 hours is good, but even if it goes to 48 hours, it’s still drinkable; it will just be thicker and more sour.
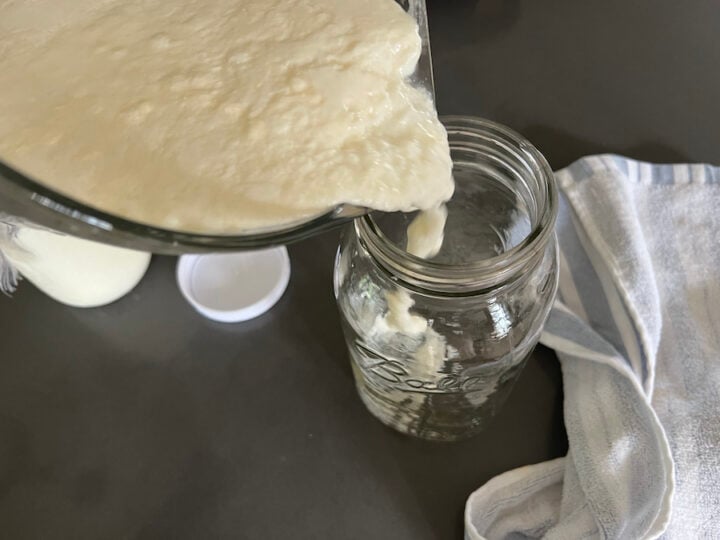
- Once the milk has thickened, line a large bowl with a mesh colander and strain off the grains. I like to move the strainer up and down so that the thick kefir can pass through the holes and into the bowl below. Alternatively, a wooden spoon can be used to gently stir the kefir into the sieve until the grains are left in the strainer.
- You’re done! You can now use kefir in your favorite recipes or drink!
- For the next batch, put the grains into some more milk and repeat. If you want to take a break, cover the grains with enough milk to cover them and put the jar in the fridge until your next batch.
How Long Can Kefir Grains Go Unfed?
Kefir grains are hard to mess up and are very forgiving. If you ever want to take a break from fermenting kefir, keep the grains covered in some milk in the refrigerator for up to 1 month. Ideally, you’ll want to use it every week or two, but it can last for weeks. It will last just fine if it’s in some milk and refrigerated. I generally discard the milk that the grains sat in if it’s been over a week in the fridge and start with fresh milk to culture.
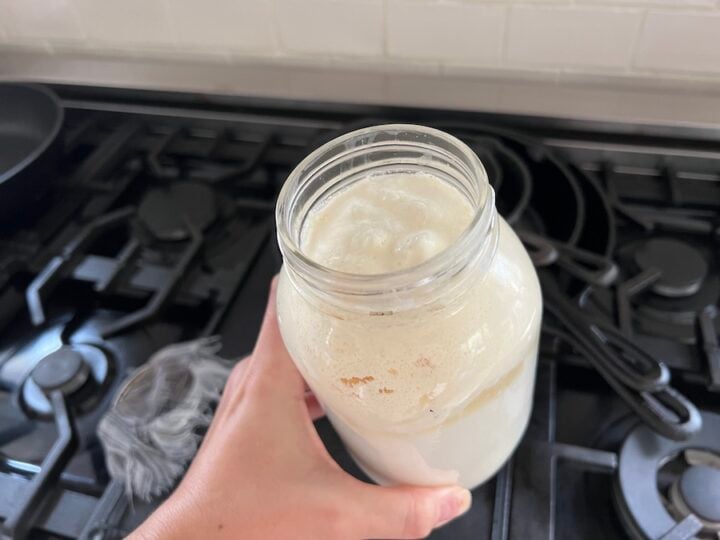
When Is Milk Kefir Done Fermenting?
Some signs you can see when a batch of kefir is ready are that the cream rises to the top (common if using raw milk) and it looks like junket or yogurt. It is common to see a layer of whey between the cream and kefir. If you tilt the jar to the side, you can see if the kefir sets into a yogurt consistency. This means it’s done and ready to be strained.
Ways To Use Kefir:
I typically make kefir for a couple of days in a row to build it up and then keep it in the fridge until my next batches. This way, you’re not overwhelmed. Then, I just pull out homemade kefir as much as I need for these delicious recipes!
- Strawberry smoothies—I like to use a combination of strawberries and blueberries with occasional frozen bananas or blackberries. I add sweetness to mask up some of the sour taste, and my children beg for these smoothies!
- Kefir Pancakes- Are Ukrainian Mlinchiki using lots of kefir! We love these pancakes with sour cream!
- Add some vanilla and stevia for a refreshing drink!
- Blend up with fruits and pour into popsicle molds for an ice cream treat! Sweeten with maple syrup or honey for sweetness if you wish!
- Use it plain in place of buttermilk for recipes! Kefir makes a great buttermilk substitute!
Q&A
Can I Make Kefir without Grains?
Yes, you can make healthy Milk Kefir without the maintenance of Milk Kefir grains. Instead, use a direct-set culture starter to start a batch, then reserve a bit from your batch, and reculture and produce for 2-7 more batches. The downside is that you will probably need to replace the culture within time, whereas milk kefir grains can last for years and years. To use store-bought kefir as a starter use 1/4 cup of store-bought Kefir to a quart of milk and let it culture, however, that too may need to be replaced within time.
How Long Do I Ferment?
This depends on how many grains you use and the temperature of your house. Generally, you ferment the milk until it gets thick at a temperature of 68-78°F. This takes 24-36 hours, but no more than 48 hours.
How Much Kefir Grains Per Jar?
Milk kefir grains multiply constantly! Too many grains and it will ferment too fast, and too little will not thicken the kefir. I like to keep 1-2 tablespoons of kefir grains in a quart-sized jar; however, a half-gallon jar will easily need 4-5 Tablespoons of kefir grains to thicken properly.
Can You Freeze Kefir Grains?
Yes, kefir grains can be frozen in a little milk for up to 6 months. They will take longer to wake up, but it is doable. Once thawed, rinse with cold water and cover with 1 cup of fresh cold milk every 24 hours until the milk thickens.
Is Kefir Good for You?
Kefir is full of good bacteria and boosts your metabolism; because of the fermentation, the lactose in the milk is converted by the good bacteria to lactic acid, soothing the gut lining. The grains help predigest the lactose, making it easier for your digestion!
Tips For Making Kefir At Home Using Milk Kefir Grains:
- Use a funnel to pour the kefir into a jar for less mess if you are not using a bowl with a spout.
- Keep your other fermented foods spaced out so none of the beneficial bacteria interact with one another.
- You can build up kefir, so you’re not culturing it every day by pouring the strained-off kefir into a jar and putting it in the refrigerator.
- Culture the kefir in a warm spot by the oven to ferment and thicken nicely.
- If your kefir has thickened within 12-20 hours, you likely have too many grains in one jar, so it’s best to gift some and culture with less. Ideally, fermenting for 24 hours is best to get the most probiotics!
- They say it is best to use wooden, glass, or plastic utensils when handling live cultures so that they don’t interact with each other. Since I only strain off the kefir with a metal mesh colander, it doesn’t seem to harm anything within such a short time.
More Fermented Foods To Make:
Milk is a Ukrainian staple, we have have learned to ferment (sour) it, make porridges, and lots of sweetned condensed milk from the abundance of fresh milk! Here are more recipes to prolong the freshness of real food!


Join My Weekly Newsletter
New recipes, homesteading, family life, what we eat in a week, and hospitality tips.
Pin this now to find it later
How To Make Kefir
Equipment
- 1 quart-sized jar
- 1 mesh strainer, (with larger holes)
- 1 coffee filter or cheesecloth, (with a rubber band or canning band to secure cover)
Ingredients
Ingredients:
- 2 Tbsp active milk kefir grains , (see notes below for dehydrated kefir grains)
- 3 1/4 cup whole milk
Instructions
Directions:
- Put two tablespoons of live and active grains into a quart-sized jar. Fill it up with cold, fresh milk, leaving a 1/4-inch headspace. Cover with a coffee filter or cheesecloth and secure with a band.

- Ferment at room temperature (68-78°F) for 24 hours or until thick. This can take up to 36 hours.
- Strain kefir grains using a strainer.
- Place the milk kefir into the fridge with a lid and keep it for up to 1 month.
- You can start another batch of milk kefir or cover the grains with some milk and refrigerate them in the glass quart-sized jar until your next batch.


Notes
- If you are starting with dehydrated kefir grains, you will need to rehydrate them before proceeding with this recipe. Follow the instructions on the package when rehydrating.
- Strain off the milk and discard it when using the grains from the fridge.
- Kefir grains will multiply when fed fresh milk, so gift them to friends and neighbors.
Nutrition (per serving)
Tried this recipe?
Mention @alyonascooking or hashtag #alyonascooking.