
This post may contain affiliate links. Read our full disclosure.
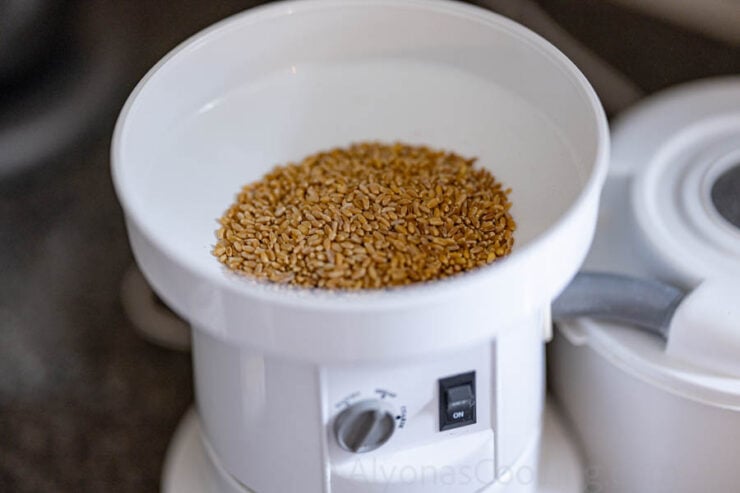
I have been making whole wheat flour at home for years, using an electric grain mill and wheat berries. It really doesn’t take much longer than measuring flour.
And the health benefits are worth the extra steps of making ground flour at home.
Whole Wheat Pita Bread
Everybody should have a good flatbread recipe in their stock of recipes! We love flatbreads like Unleavened bread or this Baked version for when we don’t want to use leavening, but these pita pockets are next in line.
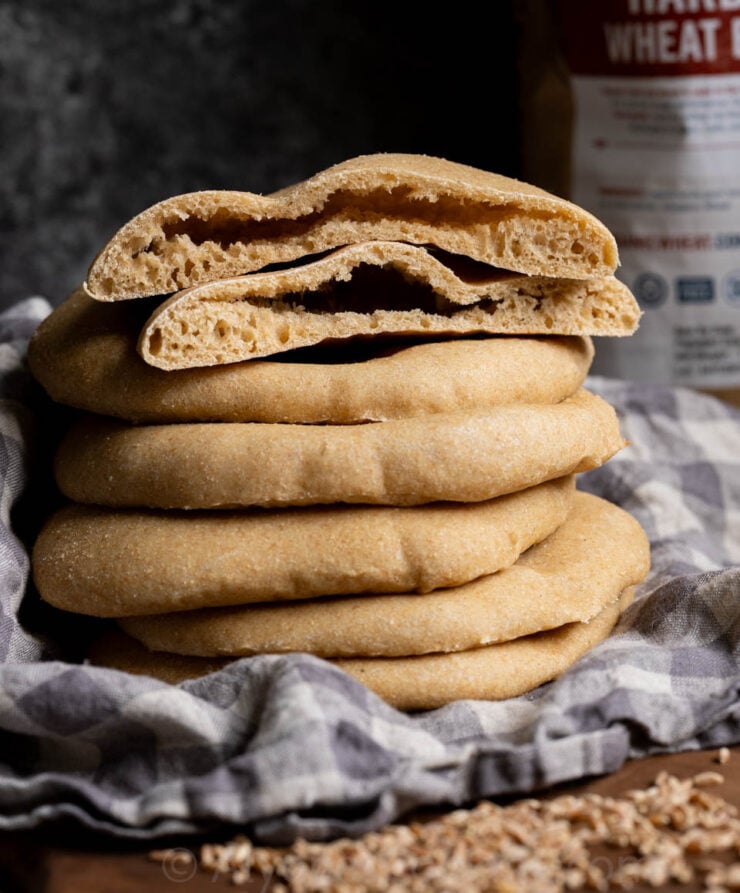
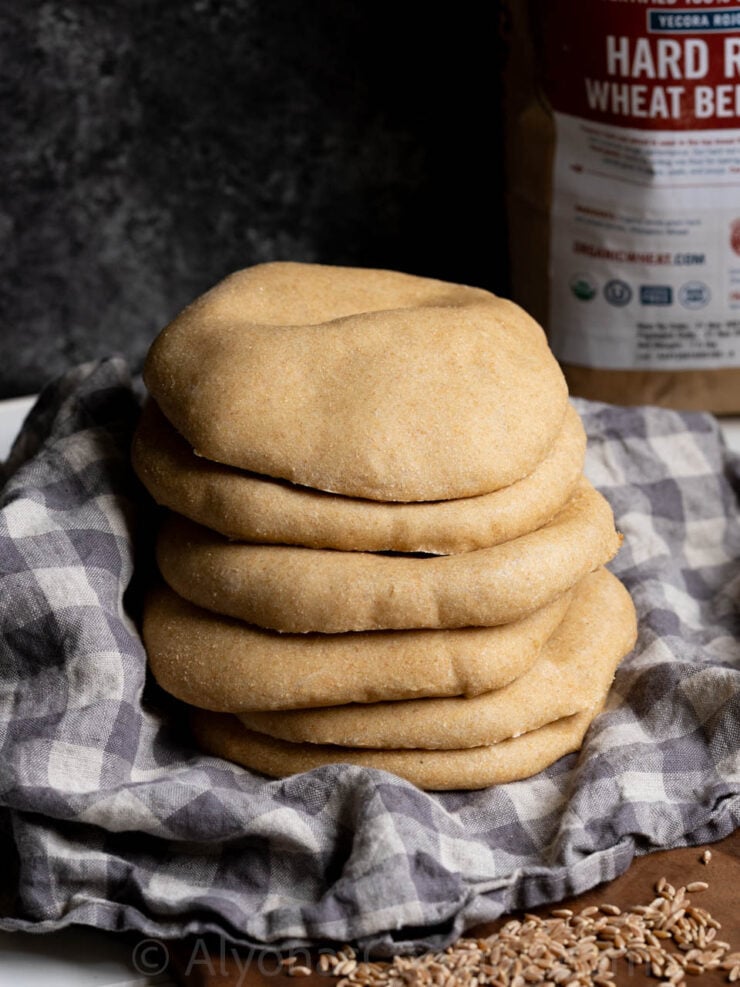
Whole grain pita bread has been one of the round, pockety breads I’ve been wanting to recreate for some time! Many store-bought ones look dry and sad and don’t come close to being as delicious or nutritious as these!
This is seriously the best whole wheat pita bread recipe! I’ve made them multiple times, and my teenage son even agrees that they are the best! He actually requested these whole-grain pita pockets for his birthday meal, stuffed with chicken salad (which says a lot)!
Plus, there are no weird ingredients, they’re super healthy (and gut-friendly from the sourdough), and rise beautifully in the oven, allowing them to be stuffed for sandwiches! Whoever said whole wheat was unappetizing or dense? These are incredible!
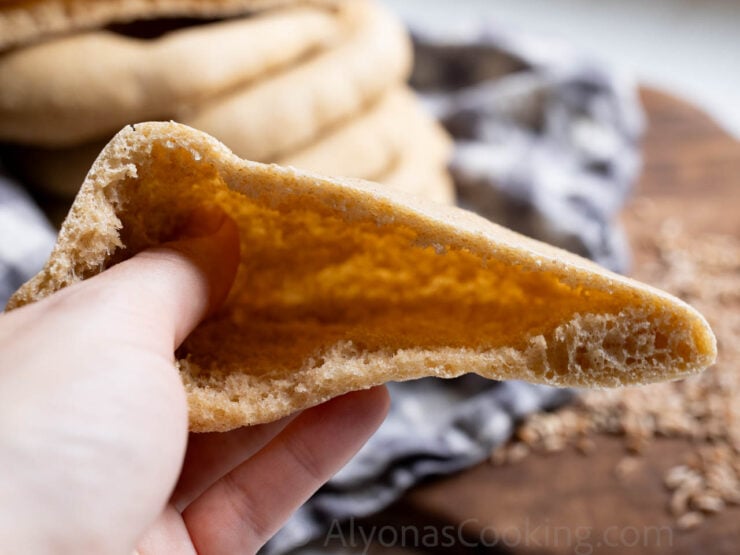
They are everything a pita bread should be! Soft and chewy. Moist and packed with hearty whole wheat grains. Perfectly round and puffy.
Use them for dipping with hummus or recreate a deli-style chicken salad sandwich.
These whole-grain pita pockets are simple to make, and sourdough keeps them moist for days (when stored properly).
To learn how to switch over to whole wheat flour, see my conversion chart to adapt your favorite recipes to fresh-milled flour.
Sourdough Pita Bread
As a busy mom, blogger, and homeschool family, you can imagine all the things that need to be done. I can really say this is an easy sourdough pita bread recipe that fits into our schedule, despite using sourdough.
The sourdough process is quite simple and doesn’t take much effort. I start the dough at noon, and by evening, it is ready to go into the oven.
Whole-wheat pita bread with sourdough is a perfect match when it comes to bread-making. Enzymes and phytic acid get broken down, making the pita bread easier to digest.
If you don’t have sourdough, buy a live starter or ask a friend. These are so worth the labor and taste incredibly delicious for whole-grain bread!
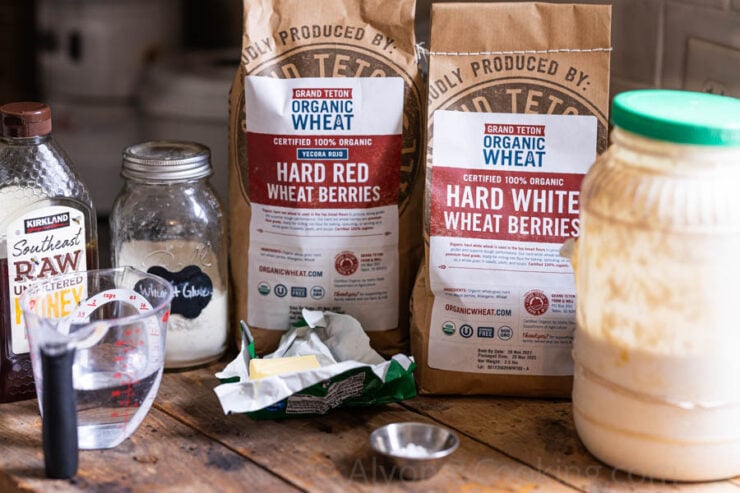
Mise en PlaceEverything You Need! :
I went to culinary school, so every chef knows what a ‘mise en place’ means! In simple form, gather all your ingredients and equipment!
Equipment:
- Extra-large 21×15 sheet pan (all six pitas will fit).
- Parchment paper
- Pastry Roller (this makes rolling out the dough a breeze)!
- Silicone pastry mat (the tacky dough doesn’t stick to it)!
- Grain Mill to grind the wheat berries.
The Best Whole Wheat Pita Bread Recipe (Ingredients and Substitutions):
- Sourdough leavens the pita and makes it extra chewy and moist. In fact, pita bread stays moist for days if using a starter. I use 1 cup of starter. To substitute 1 cup of sourdough starter with commercial yeast, mix together one packet of dry active yeast (1 1/4 tsp or 7 grams) in 1/3 cup of warm water (80-90°F). Add 2/3 cup of unbleached white flour, and proceed with the recipe. Rising times will need to be adjusted; I only advise these changes to advanced bakers who have a feel for dough and working with yeasted doughs.
- Melted Butter- makes these super soft and helps the pita retain its moisture. For a dairy-free butter substitute, opt for plant-based butter sticks or use a high-quality cooking oil like olive oil.
- Honey sweetens the dough and gives these pitas a better flavor. Use maple syrup if you’re out!
- Vital wheat gluten- improves the rise and strengthens the dough. I think it ensures elasticity, which is so vital for breads like pita. If you don’t have this, knead the dough for up to 20 minutes to naturally bring out the gluten found in hard wheat varieties.
- Wheat berries turn into whole wheat flour once milled. I used part hard white wheat and Hard Red wheat berries. There are so many wheat variations you can use, like Ancient Grains of your choice. The key is to use 50-70% of a hard wheat variety like red or white, then add in the lesser protein grains in moderation for that gluten development.
- Salt- Use a high-quality sea salt like Redmond salt.
How To Make Pita Bread Healthier
Let’s walk through how to make pita bread step-by-step. For a full photo tutorial to see how I made them, jump to the recipe card below.
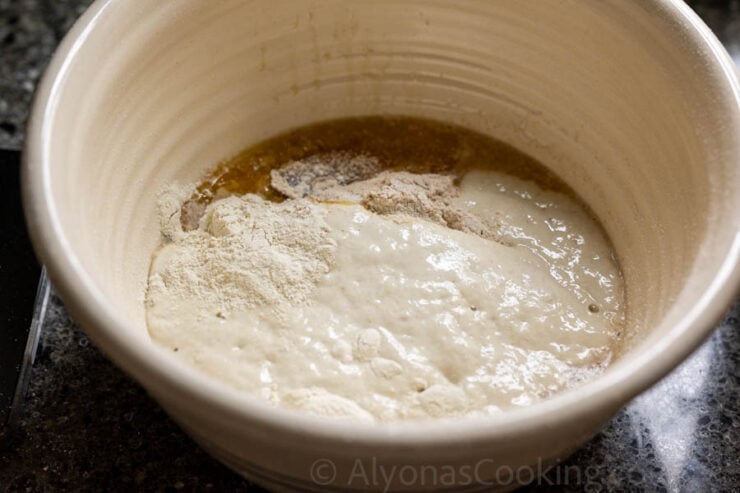
- Make the pita dough. In a large mixing bowl, combine the sourdough starter, water, melted butter, honey, vital wheat gluten, and whole wheat flour. Mix with your hands, and allow the dough to rest for 20 minutes. This is also called “Autolyse” (pronounced “auto-lease”).
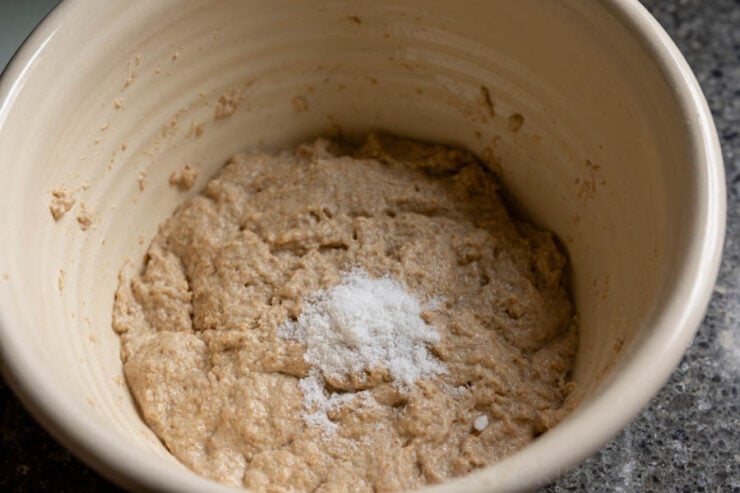
- Add the salt and knead the dough for about 4 minutes. Dough will be soft and slightly sticky.
- Do a couple of “stretch and folds” every 20 minutes (a total of 2-3 times).
- Bulk rise and ferment the dough for 4-6 hours (depending on how warm your kitchen is).
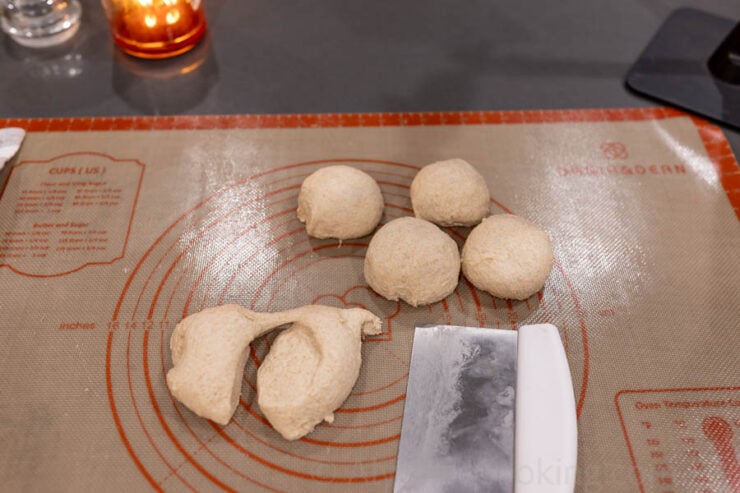
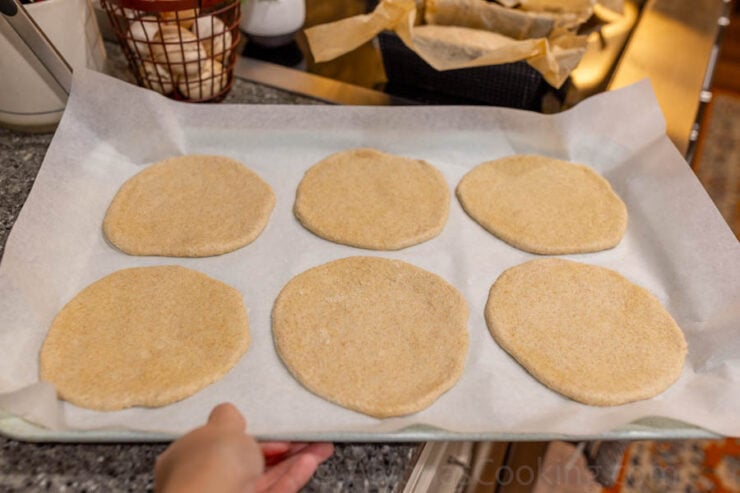
- Shape: Lightly flour your surface, divide the dough into six equal pieces, and shape them into balls. Roll out each ball using a pastry roller into 6-inch circles. Lightly dust with flour as you’re rolling out the dough.
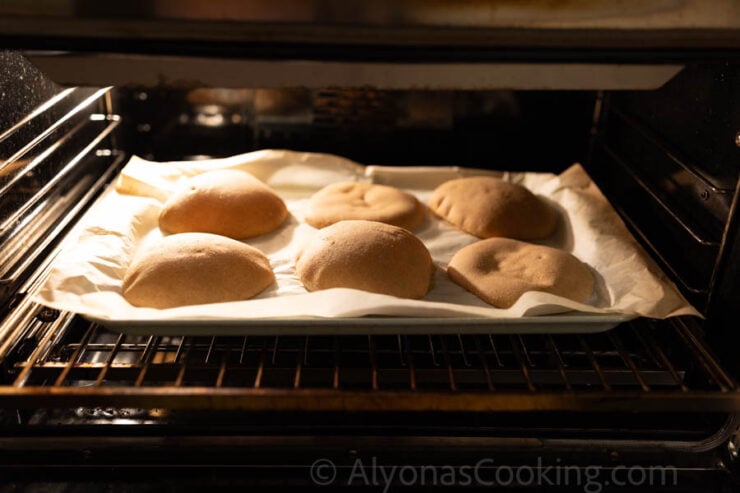
- Rise then Bake. Transfer the flat circles of dough to a parchment-lined baking sheet. Let the dough rise covered with a kitchen towel for 1-2 hours. Then bake on the bottom of a 500°F oven for 6 minutes. When the pita pockets puff up, remove them from the oven.

FAQs About Whole Wheat Pita Bread
How To Freeze Pita Bread:
This whole wheat pita bread recipe makes six medium-sized pitas that will usually last for two meals for our family of 8. If this amount seems like it would be too much, bake the pitas as directed and cool them completely over a wire rack. Use a jumbo freezer bag to freeze as many pitas as you need to. Freeze on the same day you bake them so they stay fresh and chewy.
How Do You Make Pita Bread That Puffs Up?
It is so important to allow the circles of dough to rise after they have been shaped. This will give them enough time to rest and slightly double in size. That way, when they go into a very hot oven, they puff up and expand from the high heat of the oven.
What do I Do If My Pitas Never Puff in the oven?
If your pitas never rose in the oven, there could be a few things that could’ve been the problem. Here are my educated guesses…
How to Test if your Sourdough Starter is active: do the water float test. Take 1/2 cup of warm tap water and drop one teaspoon of yeast in. If it floats, it’s active. Also check for signs of an active and bubbly starter (it should be bubbly, doubled in size, and have a bready/yeasty smell).
Ingredients were too cold: sometimes adding very cold water can prohibit it from working properly. Stick to room temperature (or warm) ingredients when it comes to dough making. For example, warm, freshly milled flour and water are okay, melted butter or softened butter are all great ways to incorporate these ingredients to make a soft dough.
Incorrect oven temperature or wrong rack positioning: It could be that the rack was not positioned at the bottom of the oven (important). Another factor could be that there was not enough time for the dough to properly rise. Make sure your oven temperature is set to 500°F before placing the pitas in.
Be sure not to tear the dough: Use a little bit of flour when shaping the pita dough. If you tear the dough when shaping it, that could be a reason it didn’t puff.
In the meantime, if your pitas are flat, use a sharp serrated knife to cut the pita in half. Then take each half and make a cut as close to the middle, of the inside pocket as possible. You can still stuff the pita this way! Or cut into triangles for dipping with hummus.
Can You Bake Pita Bread From Frozen?
Leavened and yeasted bread doughs freeze very well. The key is to use it up within 3 months for the (wild) yeast to be active. It’s also important to thaw the dough and bring it to room temperature for it to rise again.
To Freeze Sourdough Pita Bread: After you shape the pitas, let them rise for 1 hour, then flash freeze them. Be sure your starter is very active and bubbly when making pitas.
To Bake: thaw pitas for two hours at room temperature. Then let them rise 1 hour and bake in a preheated 500°F oven for the directed time, giving one extra minute of baking, if needed.
I prefer to make my whole wheat pitas the day of preparing to ensure they puff up properly in the oven. However, if you are an experienced baker and have frozen bread dough before, it’s a good way to store bread for fresh baking.
Can I use Cups instead of grams?
Yes, 2 1/4 cups of freshly milled flour can be used for the 296 grams called for in the recipe. In professional kitchens, weighing dry ingredients such as flour is preferred as it yields a more accurate result.
Another fun fact is that wheat berries weigh the same as if they were ground. To make pita bread dough, I usually weigh the wheat berries, then run them through a grain mill. Whatever gets milled is exactly how much flour I need to use for the recipe.
How To Warm Pita Bread
There are a few ways to heat up pita bread at home.
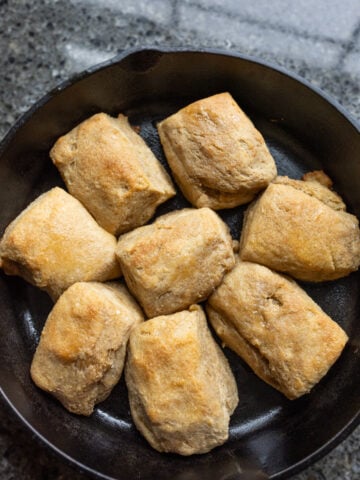
Stovetop: You can place a pita directly over a gas stove flame or use a preheated cast-iron skillet to warm it and achieve a char look. Induction stoves are best with a compatible skillet (not all pans are suitable). You could also place a pita directly over a heating element on an electric stove. Ideally, you want to heat it for 10 seconds per side (quicker with gas) or until it is evenly heated.
Microwave: To create steam, moisten a two-piece paper towel with water and wrap the pitas with it. Place on a dinner plate and microwave each pita (1) for 10-15 seconds.
Oven (good for a stack): Double wrap pitas in aluminum foil. Place over a wire rack and heat in a preheated 350°F oven for 20 minutes.
Air fryer: double-wrap the pitas in foil, then air-fry two at a time at 400°F for 3-5 minutes.
More Of Our Favorite Wholesome Bread Recipes:


Join My Weekly Newsletter
New recipes, homesteading, family life, what we eat in a week, and hospitality tips.
Pin this now to find it later
Sourdough Whole Wheat Pita Bread

Equipment
Ingredients
- 1 cup active sourdough starter
- 1 cup warm water, (80-90°F)
- 1 Tbsp melted butter
- 1 Tbsp raw honey
- 1 1/2 Tbsp vital wheat gluten
- 1 1/2 tsp sea salt
- 200 grams hard white wheat berries, (see notes below)
- 96 grams hard red wheat berries
Instructions
- Weigh the wheat berries on a scale (200 grams of hard white wheat and 96 grams of hard red wheat). Run them through a grain mill to make whole wheat flour.

- In a large mixing bowl, mix 1 cup of warm water, 1 cup active sourdough starter, 1.5 Tbsp vital wheat gluten, 1 Tbsp melted butter, 1 Tbsp honey, and 296 grams of the freshly milled flour. Mix with your hands to form a sticky dough and rest for 20 minutes, covered.
- Add 1 1/2 tsp salt and knead for 3 minutes. The dough will be very soft and slightly tacky.
- Cover the dough with plastic wrap and allow it to ferment and bulk rise for 4 hours. During the rising time, perform two to three "stretch and folds" every 20 minutes.
- Line a 21×15 pan with parchment paper and set aside. Lightly flour a large pastry mat. Transfer the pita dough onto the mat and divide the dough into 6 equal pieces. Shape pieces into balls. Starting with the first one you shaped, lightly dust the top of dough with flour and roll it out to a 6-inch circle. Put each circle of dough onto the prepared pan and let it rise 1-2 hours, covered.
- Preheat the oven to 500°F and and position the rack to the bottom. Bake pitas for 6 minutes. They should puff and be golden brown on the bottoms. Cool for 5 minutes on the pans them transfer them to a jumbo-sized freezer bag wrapped in a cotton towel to stay soft.

Notes
- You can use any combination of freshly milled flour as long as it equals 296 grams. Make sure that 50-70% of your flour is from a hard wheat variety that is high in protein for proper gluten development. Khorasan, Emmer, hard white wheat, and spring red wheat are all good options. I mostly use hard white wheat for a mild-flavored pita bread that looks lighter in color.
- The 296 grams of wheat berries yield about 2 1/4cups of whole wheat flour.
- Dairy-free butter substitute: can use a plant-based butter stick or olive oil equal to a tablespoon.
- Storing: whole grain pitas store at room temperature well for up to 3 days. Keep them in a large airtight food container or jumbo bag wrapped in a kitchen towel to stay soft and chewy.
Nutrition (per serving)
Tried this recipe?
Mention @alyonascooking or hashtag #alyonascooking.