

This post may contain affiliate links. Read our full disclosure.
Home canning is easier than you think! Preserving foods like Pickled tomatoes, strawberry jam, and Polish dill pickles is so rewarding. These recipes require heating the jars to create a vacuum seal and kill the organisms that would spoil. For food storage, without canning, you may want to check out our sauerkraut recipe or pickled cabbage.
What Is Canned Meat?
Canned meat is basically bottling raw meat into jars and pressure canning them using a pressure canner (or an Instant pot pressure cooker, more on that below.) This method of home canning is safe and is a genius way of preserving meat. To preserve meat safely, the jars need to be heated to 240°F under pressure for the lids to vacuum seal and kill off any organisms that can spoil. If you follow this canned venison recipe, you will be able to can meat of all kinds. The process remains the same for all low-acid meats that are cubed even if it’s chicken because in order to create a vacuum seal for shelf-long jars it needs to reach that temperature in each jar.
Best Type of Meat To Use:
Canned meat is best made with dark red meat like stew meat because it is made up of muscles with fibers it will get tender under pressure. Red meat can be venison (deer), beef, or bison. I do like to add extra fat when canning venison since it is leaner. If you want to use a white type of meat like chicken or pork then add some fat to each jar so it doesn’t dry out. Bringing home wild game like deer makes fantastic canned venison. It is red meat, leaner than beef which is why I add palm fruit shortening to each jar for tender stew meat. Where Can I Buy Venison? Venison and other wild game meats can be bought online from online stores like broken arrow ranch or Azure Standard.
Can I Use a Pressure Cooker?
Yes! It is safe to use a pressure cooker like an instant pot for canning meat because an Instant pot reaches up to 244°F at high pressure which is safe for canning. If you wish to use another pressure cooker, please look into the owner’s manual and check up to which temperature the cooker reaches, at high pressure. I’ve used it as a pressure canner multiple times with successful seals, however, the downside to that is that it will only fit 2-quart jars or 3-4 pints. Also please be sure to follow the same canning time, pressure canning with a pressure cooker is equivalent to 10lbs of pressure in a pressure canner (which reaches 240°F,) so, do follow the same canning time.
How To Can Meat:
Pressure canning is super easy and even easier if using an electric pressure cooker. This is the same pressure canner that I own and it fits up to 8 quarts at one time. Always add a small amount of water to the bottom of the pressure canner to create steam and the proper build-up pressure (a few inches thick is a good amount.) The correct pressure can be built quickly this way and then reduced and timed to the amount needed for canning meat. Always let the pot depressurize to cool on its own before opening the lid.
- Begin by using completely thawed or fresh meat and wash your jars with hot soapy water. Cut meat into 1-1.5-inch cubes and set aside.
- Season and mix the meat well with lots of fresh garlic, black pepper, and sea salt. A good-quality salt is key to safe canning (my favorite is sea salt.)
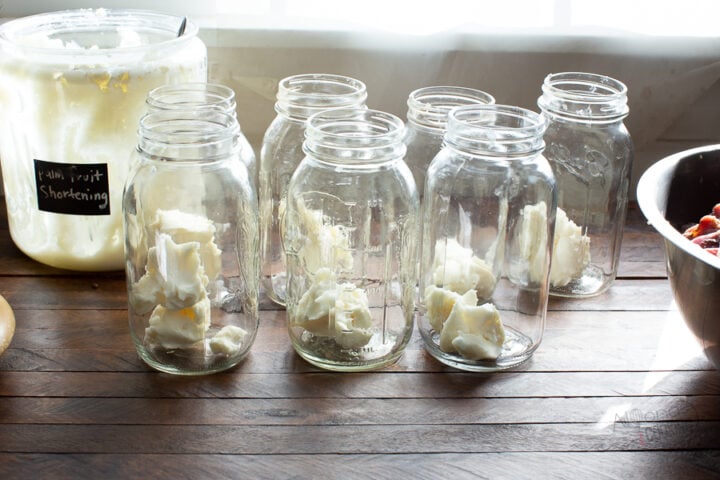
- Dollop 1/4 cup of palm fruit shortening into each quart-sized jar.
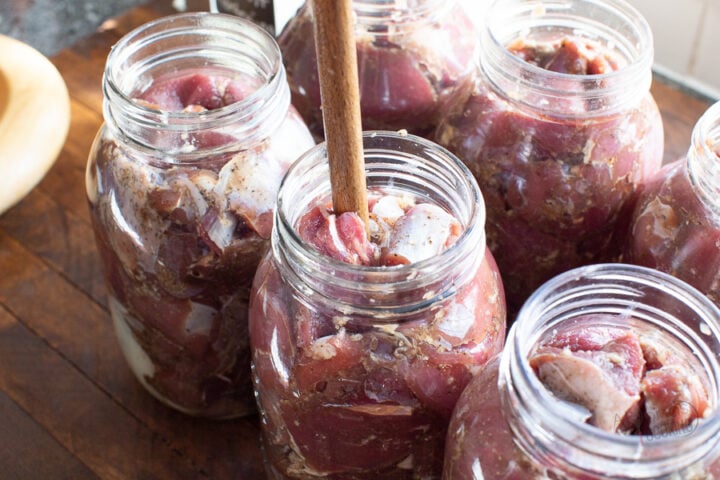
- Pack the seasoned meat into the glass jars up to the headspace (just below the rim part of the jars.)
- Cover the jars with the lids and tightly shut the bands.
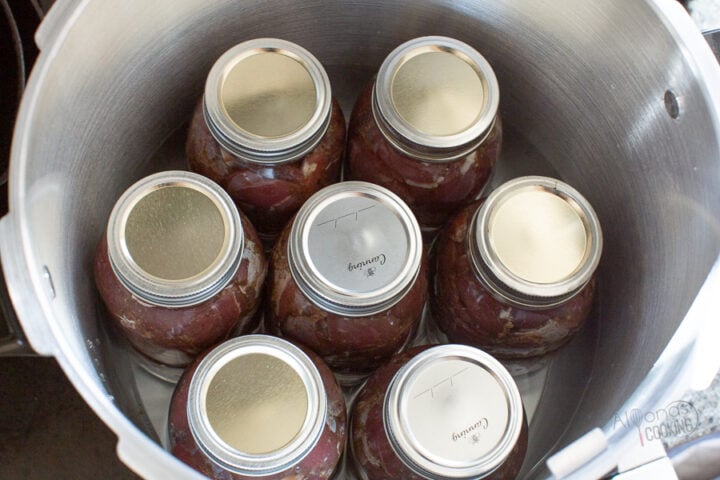
- Pour 3 quarts of water onto the bottom of a 23-quart pressure canner and carefully place the jars into the water. Seal the pressure canner lid with the cover and vent pipe and start pressurizing the pot. Once it builds up to 10 pounds of pressure keep it elevated at that mark and time it for 1 hour and 30 minutes.
- Turn off the heat and allow the pressure canner to depressure on its own. Open the po
- Open the pot and remove the jars with a jar lifter. Using a kitchen towel carefully shut each band and cool for 24 hours.
- Check the lids by pressing down on the center of each jar to make sure they are sealed and vacuum shut.
What Can I Make With Canned Meat?
So you just raw packed meat and canned venison? Now you need ideas on how to eat it or use it up! Here are dinner recipes, tasty meals, and everything you can make with canned venison or any type of canned meat!
- I love to add it to Borscht or soups! It’s already tender, to begin with, and soups are done much quicker. Use it as the meat in stew or soups.
- Use it like shredded taco meat in tacos or burritos! Simply season it with taco seasoning or Mexican rubs and heat it up.
- Stir it into gravies for extra protein. Or substitute it with the meat for beef stroganoff.
- Mix a jar into mac and cheese or spaghetti for a hearty meal.
- Make pulled BBQ Sandwiches by shredding the meat and mixing it with your favorite bbq sauce.
- Top it over salads, rice, or boiled potatoes.
I’m sure there are many more canned venison recipes to make, comment below to share how you use up canned meat or venison!
How Do I Know If My Jars Have Properly Sealed?
The best way to check if your jars have properly sealed is to wait for them to completely cool (at least 12 hours.) You do not want to press the lids down during the cooling process, as you will seal the jar and not know if it sealed on its own properly. Typically, I check the next day after canning. In order to check the seals, you want to press the center of the lid down, if you hear no clicking sound you’re good, however, if you heard a click, use up that jar or keep refrigerated because it didn’t seal.
How Long Does Canned Meat Last?
Canned venison or meat is good for 2-5 years if sealed and processed correctly using a pressure canner. Shelf-stable foods like canned venison or meat can last for years on the shelf! Always keep canned goods stored in a dark cool place and make sure the lids are all vacuumed shut and sealed.
FAQ:
Can I Use Frozen Meat?
Do you have a ton of meat to process? Or if you stocked up on meat you can keep the meat in the freezer for up to 6 months in a deep freezer before processing. Even if you bought meat frozen you can refreeze meat until you need it. Once thawed keep the meat in the fridge for up to 4 days. You do not want the meat to sit out too long when processing, so follow through with the recipe from start to finish preferably, on the same day.
How to Can Meat in the Pressure Cooker:
Are you intimidated to use a pressure canner? You can, can the meat in an electric pressure canner such as the Instant Pot at high pressure for the same amount of time. For pint jars, pressure the cans, at high pressure for 75 minutes, and for quart-sized jars 90 minutes at high pressure. For safe pressure canning in the pressure cooker, make sure the unit reaches 240°F at high pressure. An instant pot pressure cooker reaches up to 244°F which is equivalent to 10 pounds of pressure (240°F) in a pressure canner.
How Long To Pressure Can Venison?
Venison or any type of canned meat should be processed at 10 pounds of pressure for 90 minutes if using quart-sized jars or 75 minutes for pint-sized jars. This recipe for canned meat will work for any type of meat in a can.
Tips for Canning Meat:
- Use a pressure cooker to safely can your meat. An oval pressure cooker will fit more jars than an instant pot. You will need 3 cups of water for an instant pot when processing.
- After opening venison or any canned meat it can stay in the fridge for up to a week. Don’t have meat sitting out too long at room temperature, always keep meat refrigerated after preparing.
- You can, can venison, pork, beef, or chicken all at the same time. The only difference when canning meat is the size of the jars you use, which will determine the cooking time.
- After each batch, partially remove some of the water and replace it with cold water, so as to not shock the jars with hot liquid (for 3 quarts remove 1 quart of water and replace it with the same amount.)
- Always wipe and dry the rim of your jars for the seals to properly form.
- Don’t use chipped or cracked jars, especially around the mouth or rim of the jars.
- Consider the altitude and adjust accordingly to your altitude levels.
- Never fill a pressure canner with too much water, you should always keep a few inches of water at the bottom of the pressure canner to build up proper pressure. Adding too much water will take much longer to boil and can overflow the pressure canner when boiling.
- This recipe for canned venison can be used in so many ways! Use it for lunch sandwiches, or eat with old-fashioned bread.
- Got too many leftovers after opening a jar? You can freeze the cooked meat until you’re ready to use in dishes so it doesn’t go to waste.
- Mason jars have thicker walls that are perfect for home canning.
- Tightly shut the jars with the bands before pressure canning, shutting the lids loosely can result in grease overflowing your jars and escaping.
- It is normal for the fat to solidify after cooling.
More Meat Recipes:
- Easy Meatloaf Recipe
- Ultimate Burger Recipe with homemade hamburger buns
- Korean Beef Bulgogi
- Chicken Salad Sandwich
- Venison Burger Recipe
- Pigs In A Blanket (with Homemade Crescent Rolls)
How To Can Venison:
Join My Weekly Newsletter
New recipes, homesteading, family life, what we eat in a week, and hospitality tips.
Pin this now to find it later
Canned Meat
Equipment
- 7 quart-sized jars, (with new lids and bands)
- 1 23-quart pressure canner, (I used the Presto brand)
- 1 Jar lifter, (to remove jars)
- 1 kitchen towel, (to secure lids and keep hot jars on)
Ingredients
Ingredients:
- 13 pounds beef or Venison**, (cut into 1.5-inch chunks)
- 3 heads garlic, (peeled cloves and crushed)
- 4 1/2 Tbsp sea salt
- 2 Tbsp black pepper
- 1 3/4 cup palm fruit shortening , (divided into 1/4 cup portions)
Instructions
Directions:
- Wash and clean the jars with warm soapy water. Dollop 1/4 cup of shortening into each jar and set aside.

- Season the meat with garlic, salt, and pepper, and mix well with your hands.
- Pack the meat up to the headspace and push down the mixture with the end of a wooden spoon to let out any air pockets and pack the meat down. Tightly shut the jars.
- Pour 3 quarts of water into a 23-quart pressure canner. Place the jars in and process the jars at 10 pounds pressure for 90 minutes.
- Turn off the heat and allow the pressure canner to depressurize until the gauge is at zero. Open the canner and remove jars with a jar lifter then tightly shut each jar with a kitchen towel. Let cool for 24 hours.


Notes
- Palm fruit shortening can be substituted with lard or any other type of shortening. Omit if using beef or pork and use for leaner meats.
- **Beef, Venison, chicken, or pork can be used for the same cooking time.
- For Pint-sized jars, pressure can, at 10 pounds for 75 minutes.
- You can use the instant pot (pressure cooker) for canning meat. Pressure cook at high pressure for 75 minutes for pints and 90 minutes for quarts. The instant pot reaches up to 244°F at high pressure which is equivalent to a pressure canner temperature of 10 pounds (240°F.)
Nutrition (per serving)
Tried this recipe?
Mention @alyonascooking or hashtag #alyonascooking.